Online Learning

今回作成するUI
今回作成するUIは👇をベースに考えています。
完成イメージ
以下のような画面を作ってみましょう。
今回は大きく分けて2つのページに分かれていて、 ページ遷移時にはアニメーションが含まれています。
- トップページ
- コース一覧ページ
それでは、UIとアニメーションを作ってみましょう。

|

|
|
トップページUI
まずはじめに、トップページのUIを作ってしまいましょう。
※ UI作成の内容がよく分からない場合は、初級編に戻り UI作成を練習しましょう
import 'package:flutter/material.dart';
void main() {
runApp(MyApp());
}
const figmaLogoUrl =
'https://user-images.githubusercontent.com/7200238/83031886-1ce87880-a070-11ea-89c8-5cee840d5782.png';
const sketchLogoUrl =
'https://user-images.githubusercontent.com/7200238/83145378-a7dc7800-a12f-11ea-93e1-32c7982c5e63.png';
const xdLogoUrl =
'https://user-images.githubusercontent.com/7200238/83145578-f558e500-a12f-11ea-85fa-3e26a966d180.png';
class MyApp extends StatelessWidget {
// This widget is the root of your application.
Widget build(BuildContext context) {
return MaterialApp(
debugShowCheckedModeBanner: false,
title: 'Flutter Demo',
theme: ThemeData(
primarySwatch: Colors.blue,
visualDensity: VisualDensity.adaptivePlatformDensity,
),
home: TopPage(),
);
}
}
class _Header extends StatelessWidget {
final String title;
const _Header({
Key? key,
required this.title,
}) : super(key: key);
Widget build(BuildContext context) {
return Container(
width: double.infinity,
padding: EdgeInsets.symmetric(vertical: 24),
alignment: Alignment.centerLeft,
child: Text(
title,
style: TextStyle(fontSize: 28, fontWeight: FontWeight.bold),
),
);
}
}
class _Hero extends StatelessWidget {
Widget build(BuildContext context) {
return Card(
elevation: 0,
shape: RoundedRectangleBorder(
borderRadius: BorderRadius.circular(16),
),
color: Colors.blue[50],
child: Container(
width: double.infinity,
padding: EdgeInsets.all(16),
child: Column(
crossAxisAlignment: CrossAxisAlignment.start,
children: [
Container(
width: 150,
child: Text('Choose from over 100,000 online video courses'),
),
SizedBox(height: 16),
TextButton(
onPressed: () {},
style: TextButton.styleFrom(
primary: Colors.white,
backgroundColor: Colors.blue,
shape: RoundedRectangleBorder(
borderRadius: BorderRadius.circular(8),
),
padding: EdgeInsets.symmetric(
vertical: 20,
horizontal: 32,
),
),
child: Text('Browse all courses'),
),
],
),
),
);
}
}
class _FigmaLogo extends StatelessWidget {
final double size;
const _FigmaLogo({
Key? key,
required this.size,
}) : super(key: key);
Widget build(BuildContext context) {
return ClipOval(
child: Container(
width: size,
height: size,
padding: EdgeInsets.all(8),
color: Colors.black,
child: Image.network(figmaLogoUrl, fit: BoxFit.contain),
),
);
}
}
class _Featured extends StatelessWidget {
Widget build(BuildContext context) {
return Container(
child: Column(
children: [
Container(
width: double.infinity,
padding: EdgeInsets.only(top: 32, left: 8),
alignment: Alignment.centerLeft,
child: Text(
'Featured',
style: TextStyle(fontSize: 20, fontWeight: FontWeight.bold),
),
),
Stack(
children: [
Container(
margin: EdgeInsets.only(top: 24),
child: Card(
shape: RoundedRectangleBorder(
borderRadius: BorderRadius.circular(16),
),
child: Container(
padding: EdgeInsets.symmetric(
horizontal: 8,
vertical: 32,
),
child: Row(
mainAxisAlignment: MainAxisAlignment.spaceBetween,
children: [
Icon(Icons.navigate_before),
Container(
width: 180,
child: Column(
children: [
Text(
'Figma: Solid Foundations',
style: TextStyle(fontWeight: FontWeight.bold),
),
SizedBox(height: 16),
Text(
'The most complete beginner to advanced guide',
textAlign: TextAlign.center,
),
],
),
),
Icon(Icons.navigate_next),
],
),
),
),
),
Align(
alignment: Alignment.topCenter,
child: _FigmaLogo(size: 48),
),
],
),
],
),
);
}
}
class _TrendingCourses extends StatelessWidget {
Widget build(BuildContext context) {
return Container(
child: Column(
children: [
Container(
padding: EdgeInsets.only(top: 32, bottom: 8, left: 8),
alignment: Alignment.centerLeft,
child: Text(
'Trending Courses',
style: TextStyle(fontSize: 20, fontWeight: FontWeight.bold),
),
),
Card(
shape: RoundedRectangleBorder(
borderRadius: BorderRadius.circular(16),
),
child: Container(
padding: EdgeInsets.all(16),
child: Column(
children: [
Container(
color: Colors.grey[100],
child: ListTile(
leading: Icon(Icons.school, color: Colors.blue),
trailing: Text('Communication Skills'),
),
),
SizedBox(height: 8),
Container(
color: Colors.grey[100],
child: ListTile(
leading: Icon(Icons.school, color: Colors.blue),
trailing: Text('Digital Marketing 101'),
),
),
SizedBox(height: 8),
Container(
color: Colors.grey[100],
child: ListTile(
leading: Icon(Icons.school, color: Colors.blue),
trailing: Text('UX Research'),
),
),
SizedBox(height: 16),
Container(
width: double.infinity,
child: TextButton(
onPressed: () {},
style: TextButton.styleFrom(
primary: Colors.white,
backgroundColor: Colors.blue,
shape: RoundedRectangleBorder(
borderRadius: BorderRadius.circular(8),
),
padding: EdgeInsets.symmetric(vertical: 20),
),
child: Text('View trending list'),
),
),
],
),
),
),
],
),
);
}
}
class TopPage extends StatefulWidget {
_TopPageState createState() => _TopPageState();
}
class _TopPageState extends State<TopPage> with SingleTickerProviderStateMixin {
Widget build(BuildContext context) {
return Scaffold(
body: SafeArea(
child: SingleChildScrollView(
child: Container(
padding: EdgeInsets.symmetric(horizontal: 16),
child: Column(
children: [
_Header(title: 'TurtleU'),
_Hero(),
_Featured(),
_TrendingCourses(),
],
),
),
),
),
floatingActionButton: FloatingActionButton(
onPressed: () {},
child: Icon(Icons.list),
),
);
}
}
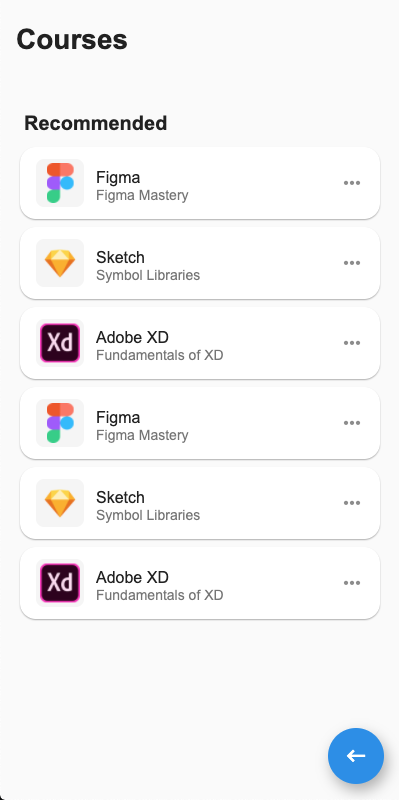
コース一覧ページUI
次にコース一覧ページのUI部分を作っていきましょう。
各ページの切り替えは、FloatingActionButton をタップすることで行えるようにしてみます。
class TopPage extends StatefulWidget {
_TopPageState createState() => _TopPageState();
}
class _TopPageState extends State<TopPage> with SingleTickerProviderStateMixin {
Widget build(BuildContext context) {
return Scaffold(
body: SafeArea(
child: SingleChildScrollView(
child: Container(
padding: EdgeInsets.symmetric(horizontal: 16),
child: Column(
children: [
_Header(title: 'TurtleU'),
_Hero(),
_Featured(),
_TrendingCourses(),
],
),
),
),
),
floatingActionButton: FloatingActionButton(
onPressed: () {
Navigator.of(context)
.push(
PageRouteBuilder(pageBuilder: (_, __, ___) => CoursesPage()),
);
},
child: Icon(Icons.list),
),
);
}
}
class _CourseCard extends StatelessWidget {
final String title;
final String subtitle;
final String logoUrl;
const _CourseCard({
Key? key,
required this.title,
required this.subtitle,
required this.logoUrl,
}) : super(key: key);
Widget build(BuildContext context) {
return Card(
shape: RoundedRectangleBorder(
borderRadius: BorderRadius.circular(16),
),
child: Container(
padding: EdgeInsets.symmetric(vertical: 4),
child: ListTile(
leading: Container(
width: 48,
height: 48,
padding: EdgeInsets.all(4),
decoration: BoxDecoration(
color: Colors.grey[100],
borderRadius: BorderRadius.circular(8),
),
child: Image.network(
logoUrl,
fit: BoxFit.contain,
),
),
title: Text(title),
subtitle: Text(subtitle),
trailing: Icon(Icons.more_horiz),
),
),
);
}
}
class _Recommended extends StatelessWidget {
Widget build(BuildContext context) {
return Column(
children: [
Container(
padding: EdgeInsets.only(top: 32, bottom: 8, left: 8),
alignment: Alignment.centerLeft,
child: Text(
'Recommended',
style: TextStyle(fontSize: 20, fontWeight: FontWeight.bold),
),
),
_CourseCard(
title: 'Figma',
subtitle: 'Figma Mastery',
logoUrl: figmaLogoUrl,
),
_CourseCard(
title: 'Sketch',
subtitle: 'Symbol Libraries',
logoUrl: sketchLogoUrl,
),
_CourseCard(
title: 'Adobe XD',
subtitle: 'Fundamentals of XD',
logoUrl: xdLogoUrl,
),
_CourseCard(
title: 'Figma',
subtitle: 'Figma Mastery',
logoUrl: figmaLogoUrl,
),
_CourseCard(
title: 'Sketch',
subtitle: 'Symbol Libraries',
logoUrl: sketchLogoUrl,
),
_CourseCard(
title: 'Adobe XD',
subtitle: 'Fundamentals of XD',
logoUrl: xdLogoUrl,
),
],
);
}
}
class CoursesPage extends StatefulWidget {
_CoursesPageState createState() => _CoursesPageState();
}
class _CoursesPageState extends State<CoursesPage> {
Widget build(BuildContext context) {
return Scaffold(
body: SafeArea(
child: Container(
height: double.infinity,
child: SingleChildScrollView(
child: Container(
padding: EdgeInsets.symmetric(horizontal: 16),
child: Column(
children: [
_Header(title: 'Courses'),
_Recommended(),
],
),
),
),
),
),
floatingActionButton: FloatingActionButton(
onPressed: () {
Navigator.of(context).pop();
},
child: Icon(Icons.keyboard_backspace),
),
);
}
}
アニメーション
今回作成するアニメーションの動きを改めて確認しましょう。
ご覧の通り、このアニメーションには以下のような特徴がありますね。
- アニメーションの動きにメリハリがある
- 各Widgetのアニメーションが連続している
それぞれの特徴に対する実現方法を紹介していきたいと思います💪
まず、アニメーションの動きにメリハリがある 特徴に関しては、
CurvedAnimation を使うことで実現できます。
アニメーション基礎で紹介したとおり、
AnimationControllerは指定された時間で値を変化させてくれます。
デフォルトではこの値の変化は直線的なので、
今回実現したいアニメーションの様にメリハリのある動きにはなっていません。
メリハリのある動きにするには、値が変化していく波形を変化させる必要があります。
この 波形を変化させる処理 を行ってくれるのが CurevedAnimation なのです。
使い方に関しては、AnimationControllerと変化させたい波形をパラメータから渡せばOKです。
controller = AnimationController(
  vsync: this,
  duration: Duration(seconds: 1),
);

tween = Tween<Offset>(
  begin: Offset.zero,
  end: Offset(-1.0, 0.0),
);

animation = tween.animate(CurvedAnimation(
  parent: _controller, // AnimationControllerを指定
  curve: Curves.easeInOutBack, // 変化させたい波形を指定
));

次に 各Widgetのアニメーションが連続している 特徴に関しては、
Interval を使うことで実現できます。
この Interval を使うと アニメーションの動作時間を変化 させる事ができます。
つまり、複数アニメーション全体の動作時間の中から、
各Widgetに対するアニメーションの動作時間を個別に変化 させることで、
連続的なアニメーションを実現することができるのです。
使い方に関しては、変化させたい波形のパラメータとして指定すればOKです。
animation = tween.animate(CurvedAnimation(
  parent: _controller,
  curve: Interval(0.1, 0.8, curve: Curves.easeInOutBack),
));

それでは、これらの仕組みを使い、
作成したUIに対してアニメーションを適用してみましょう💪
今回のアニメーションは画面外に移動していくような動きなので
SlideTransitionを使いOffsetを変更する形で実装してみます。
class TopPage extends StatefulWidget {
_TopPageState createState() => _TopPageState();
}
class _TopPageState extends State<TopPage> with SingleTickerProviderStateMixin {
late AnimationController _controller;
late Animation<Offset> _animation1;
late Animation<Offset> _animation2;
late Animation<Offset> _animation3;
late Animation<Offset> _animation4;
void initState() {
super.initState();
_controller = AnimationController(
vsync: this,
duration: Duration(seconds: 1),
);
final tween = Tween<Offset>(
begin: Offset.zero,
end: Offset(-1.0, 0.0),
);
_animation1 = tween.animate(CurvedAnimation(
parent: _controller,
curve: Interval(0.0, 0.7, curve: Curves.easeInOutBack),
));
_animation2 = tween.animate(CurvedAnimation(
parent: _controller,
curve: Interval(0.1, 0.8, curve: Curves.easeInOutBack),
));
_animation3 = tween.animate(CurvedAnimation(
parent: _controller,
curve: Interval(0.2, 0.9, curve: Curves.easeInOutBack),
));
_animation4 = tween.animate(CurvedAnimation(
parent: _controller,
curve: Interval(0.3, 1.0, curve: Curves.easeInOutBack),
));
}
void dispose() {
_controller.dispose();
super.dispose();
}
Widget build(BuildContext context) {
return Scaffold(
body: SafeArea(
child: SingleChildScrollView(
child: Container(
padding: EdgeInsets.symmetric(horizontal: 16),
child: Column(
children: [
SlideTransition(
position: _animation1,
child: _Header(title: 'TurtleU'),
),
SlideTransition(
position: _animation2,
child: _Hero(),
),
SlideTransition(
position: _animation3,
child: _Featured(),
),
SlideTransition(
position: _animation4,
child: _TrendingCourses(),
),
],
),
),
),
),
floatingActionButton: FloatingActionButton(
onPressed: () {
_controller.forward().then((_) {
Navigator.of(context)
.push(
PageRouteBuilder(pageBuilder: (_, __, ___) => CoursesPage()),
)
.then((_) => _controller.reverse());
});
},
child: Icon(Icons.list),
),
);
}
}
class CoursesPage extends StatefulWidget {
_CoursesPageState createState() => _CoursesPageState();
}
class _CoursesPageState extends State<CoursesPage>
with SingleTickerProviderStateMixin {
late AnimationController _controller;
late Animation<Offset> _animationHorizontal;
late Animation<Offset> _animationVertical;
void initState() {
super.initState();
_controller = AnimationController(
vsync: this,
duration: Duration(seconds: 1),
);
_animationHorizontal = Tween<Offset>(
begin: Offset(-1.0, 0.0),
end: Offset.zero,
).animate(CurvedAnimation(
parent: _controller,
curve: Curves.easeInOutBack,
));
_animationVertical = Tween<Offset>(
begin: Offset(0.0, 1.5),
end: Offset.zero,
).animate(CurvedAnimation(
parent: _controller,
curve: Curves.easeInOutBack,
));
_controller.forward();
}
void dispose() {
_controller.dispose();
super.dispose();
}
Widget build(BuildContext context) {
return Scaffold(
body: SafeArea(
child: Container(
height: double.infinity,
child: SingleChildScrollView(
child: Container(
padding: EdgeInsets.symmetric(horizontal: 16),
child: Column(
children: [
SlideTransition(
position: _animationHorizontal,
child: _Header(title: 'Courses'),
),
SlideTransition(
position: _animationVertical,
child: _Recommended(),
),
],
),
),
),
),
),
floatingActionButton: FloatingActionButton(
onPressed: () {
_controller.reverse().then((_) {
Navigator.of(context).pop();
});
},
child: Icon(Icons.keyboard_backspace),
),
);
}
}
お疲れさまでした
UI・アニメーションは無事作成できたでしょうか?
この他にも様々なUI・アニメーションを作ってみて、
Flutterで複雑なUI・アニメーションが表現できるように頑張りましょう 💪
